Showing posts with label foss. Show all posts

Friday, October 02, 2015

Rate limiting Shopify API using Cuttle

During the development of a Shopify app, it is required to respect the API rate limit set by Shopify. Typically, we can use sleep() statement to make pause between API calls. This simple method works great until there are multiple processes that make API calls concurrently.

There are quite a number of ways to solve the problem.

1. Serialize all API calls into a single process, though not all business logics can work in this way.
2. Host a RPC server / use a task queue to make API calls. The RPC server / queue manager has to rate limit the API calls. [http://product.reverb.com/2015/03/07/shopify-rate-limits-sidekiq-and-you/]
3. Centralize all API calls with a HTTP proxy where the proxy performs rate limiting.

Personally, I think the RPC server / task queue option is quite heavy weighted since that requires:

* A RPC / task framework, and
* A RPC server / task queue, and
* A rate limit system built around the RPC server / task queue.

In contrast, the HTTP proxy option only requires a HTTP proxy server plus a HTTP client. And, HTTP is well supported in many programming languages and systems. It sounds as a great starting point.

(BTW, HTTP can be considered as the underlying protocol of a RPC system.)

With the HTTP proxy option, there are quite a few options to get started.

1. Use Nginx reverse proxy to wrap the API, use its limit module to perform simple rate limit or write a Lua/JS plugin for more sophisticated control. [http://codetunes.com/2011/outbound-api-rate-limits-the-nginx-way/]
2. Use Squid forward proxy to perform simple rate limit by client info (e.g. IP address).

At the first glance, the Nginx reverse proxy option looks superior since we can have sophisticated rate limit control deployed. Though, using such approach would need to use the Nginx wrapped URL of Shopify API. Or, we have to modify DNS/host configuration to route the traffic.

Personally, I am not comfortable in modifying the URL to Shopify API since that may prevent a smooth upgrade of the Shopify API client in the future. For the DNS option, shall I modify the DNS config once per a new Shopify store install the app?

(We may also route all traffic to the default virtual host of Nginx and use Lua/JS plugin for the host routing. This does not require URL wrapping or DNS configuration. Though, I personally think this is kinda abusing Nginx.)

So, reverse proxy may not be a good way to go. Let's come to the forward proxy option. In this case, we do not need to do anything on the URL to Shopify API and just let the traffic goes through the proxy by configuring the HTTP client. A forward proxy with rate limit control sounds like a good way to go.

Here, we come to Cuttle proxy. [http://github.com/mrkschan/cuttle]

Cuttle proxy is a HTTP forward proxy solely designed for outbound traffic rate limit using goroutine. It would provide a set of rate limit controls for different scenarios. In case of Shopify API, we can use the following Cuttle settings to perform rate limiting.

addr: :3128
zones:
  - host: "*.myshopify.com"
    shared: false
    control: rps
    rate: 2
  - host: "*"
    shared: true
    control: noop

Then, set the HTTP proxy of the Shopify API client like below to route API calls through Cuttle.

# apiclient.py
import shopify

shop_url = 'https://{}:{}@{}/admin'.format(API_KEY, PASSWORD, SHOPIFY_DOMAIN)
shopify.ShopifyResource.set_site(shop_url)

print json.dumps(shopify.Shop.current().to_dict())

# Run
HTTPS_PROXY=127.0.0.1:3128 python apiclient.py

As long as all API clients are configured to use Cuttle, API calls will be rate limited at 2 requests per second per Shopify store. So, the rate limit bucket would rarely go empty.

Note: It is up to you to set the rate of API calls in Cuttle, using 3 requests per second per store would be another great option. You will receive HTTP 429 sent by Shopify roughly after 120 continouos API calls to the same store over 40 seconds.

Note: API calls will be forwarded by Cuttle using the first come first serve manner. If the concurrency level of API calls to the same Shopify store is high, some API calls will wait for a significant amount of time instead of receiving HTTP 429 sent by Shopify immediately. Remember to set a reasonable HTTP timeout in that case.

(FYI, the Shopify API rate limit only favors high concurrency level for a short duration. If you really need that in your case, Cuttle would not be a good option.)

Friday, May 15, 2015

Scope finding in a source file

This post is going to discuss an issue I met when building a text editor plugin that tries to find the class/function scope which the current line on the editor belongs to (http://atom.io/packages/ctags-status). The problem I met can be broken into two parts: (i) Given a set of ranges that may be overlapping on a one dimension plane, find the ranges that cover a point on the plane. (ii) Given a set of overlapping ranges, get the topmost range where the height of ranges follows the ascending order of the starting point of all ranges (the higher in the stack, the later in the sequence). Note, the issue is not a hard problem. This post documents how I encounter and work on the problem.

So, here is the story.

When I build the early version of the plugin, I want to ship it as soon as possible and see if it is downloaded by anyone (Atom editor does not expose plugin usage data to its author yet, so the only number I have is downloads). Thus, there was not much thought process in those days.

The early implementation models each scope as a range with start and end line. To find the scope that the current line belongs to, the problem becomes a range search problem. Ranges would be overlapping when there is nested scope. In that case, the start and end lines of the inner scope would always be enclosed by those of the outer scopes. So, I can sort all scopes by their start line in ascending order, and the innerest scope on the current line would be the last one in the sequence that its line range encloses the current line. This is a O(N log N) preprocessing + O(N) lookup. I was happy with it.

So far so good?

The issue was not surfaced until I used the plugin to browse a long source file that has dozens of functions (yup, shouldn't the file be split for readability?). When I kept moving down the cursor for a while, its movement was no longer smooth. The issue was that the plugin needs to find the scope upon each cursor line change. When I fired up the profiler, I found 300 - 400ms were spent on scope finding when there were dozens of continuous cursor line changes. I was not sure whether the plugin was really the cause of the UX problem but it is the one that took most of the processing time. So, time for optimization!

Since this is a range search problem, KD tree, segment tree, and interval tree quickly came to my mind. There are several factors to consider in picking a solution: (i) availability of existing implementation (I don't like reinventing without enhancement), (ii) speed of insert / delete / update (when a source file is edited, there is a high chance that scopes are moved), and (iii) lookup speed of course. When I was still deciding which search tree best fits the issue, I raised a questions to myself. Why don't simply hash the scope(s) on each line? A simple hash with a stack in each bucket is a good fit because:

(i) I just need JavaScript object (hash) and array (stack) to build it.
(ii) A typical source file has less than thousand of lines with a dozen of scopes. The worst case is having thousands of pointers (lines * scopes) referring to a dozen of strings (scope names). That should not take a lot of spaces.
(iii) A file edit would introduce quite a lot of scope movements (e.g. insert a new line at top of the file pushes all scopes down). Maintaining a data structure via insert / update / delete is like rebuilding it in the worst case. Building a big hash takes O(NL), number of scopes * number of lines in the file (which is several thousands of iterations). The hash building process is offline and I don't expect it would take long, so I am happy with that.
(iv) O(1) lookup, the best that I can get.

As a result, the plugin is using a hash for scope finding.

Sunday, February 23, 2014

Python descriptor, Django CharField with encryption

This post is part of the pyfun series, I will try to *log* some of the features that I think they make Python funny :)

One of the most recent topics in my reading list is Python descriptor.
An object attribute with “binding behavior”, one whose attribute access has been overridden by methods in the descriptor protocol. Those methods are __get__(), __set__(), and __delete__(). If any of those methods are defined for an object, it is said to be a descriptor. - http://docs.python.org/2/howto/descriptor.html
When I finish the howto on python.org, I don't really understand what is it and thus my read-later list kept expanding with a lot of related articles; until I came across this post (If you don't know what is Python descriptor, I recommend you to read the post first since I'm not here to re-post the details with my poor English).

The purpose of this post is to extend the recommended reading to provide another example use of Python descriptor - a encryption/decryption wrapper of a Django `CharField`.

One of the major purpose to implement a Python descriptor is to provide getter and setter to attributes. In some traditional programming languages, we have to implement/generate a set of getter and setter to protect the read/write access of attributes. Or, we can use a generic attribute class that has the protection but the access of the attributes looks like `object.attribute.get()` and `object.attribute.set(xxx)`. Python descriptor solves both of the mentioned problems.

To encrypt/decrypt a `CharField`, it is obvious to override its `get()`/`set()` functions. We can simply do so by extending the `CharField` just like this snippets. However, I would like to demonstrate the use of Python descriptor (yep, I'm abusing it here).

At first, we need the descriptor with encryption and decryption. The cipher we use here is a simple 32-bytes XOR without padding (which is simply uesless in most of the cases).

class EncryptedAttr(object):
    '''Descriptor that encrypt content on write, decrypt on read'''
    def __init__(self, attr, secret_key):
        self.attr = attr
        self.key = secret_key

    def encrypt(self, v):
        '''A simple XOR chiper'''
        return ''.join(chr(ord(a) ^ ord(b)) for (a, b) in zip(self.key, v))

    def decrypt(self, v):
        '''A simple XOR chiper'''
        return ''.join(chr(ord(a) ^ ord(b)) for (a, b) in zip(self.key, v))

    def __get__(self, obj, klass):
        '''Get `attr` from owner, and decrypt it'''
        cipher_text = getattr(obj, self.attr, None)
        if not cipher_text:
            return ''

        return self.decrypt(cipher_text)

    def __set__(self, obj, value):
        '''Encrypt value, and set to owner via `attr`'''
        if not value:
            setattr(obj, self.attr, '')
            return

        cipher_text = self.encrypt(value)
        setattr(obj, self.attr, cipher_text)

The descriptor requires a Django model attribute name and a secret key in its constructor. The attribute name is used to look up the wrapped attribute of the Django model in its `__get__()` and `__set__()` functions. To use it, we just assign it as an attribute to the model class.

class Secret(models.Model):
    wrapped = models.CharField(max_length=32)
    content = EncryptedAttr('wrapped', 'This is the 32-bytes secret key.')


# Let's make a secret
payload = 'The secret must be 32-bytes long'  # Because we use a 32-bytes XOR
s = Secret()
s.content = payload

s.wrapped
>>> '32-bytes blah blah blah blah ...'

s.content
>>> 'The secret must be 32-bytes long'

In this example, the CharField `wrapped` attribute is not expected to be accessed directly. When we assign plain text to `content`, the plain text is encrypted and stored to `wrapped`. The `content` attribute does not hold anything at all. On the other hand, when we read from `content` attribute, it actually decrypts the cipher text from `wrapped`.

You may get the sample Django project to play around at https://github.com/mrkschan/encrypted-field.

Thursday, October 17, 2013

Partial function call

This post is part of the pyfun series, I will try to *log* some of the features that I think they make Python funny :)

Again, I was reading the Scala tutorial and find that she has built-in support of partial function call (see http://twitter.github.io/scala_school/basics.html#functions). This reminded me that Python does also has functools.partial(), which can be used as function shortcuts.

Let's see this example of Django.

# Let's have a Coupon that can either be fixed amount discount or percentage off
# But, we don't want to have model inheritance and table join to get the data
class Coupon(models.Model):
    code = models.CharField(max_length=8)
    type = models.CharField(max_length=11, choices=['fixedamount', 'percentage'])
    amount = models.DecimalField(max_digits=8, decimal_places=2)
    currency = models.CharField(max_length=3, choices=['USD', 'CAD'], default='')


# To create a Coupon based on certain conditions, you can have this
kwargs = {'code': code}

if condition_a:
    kwargs.update({'type': 'fixedamount', 'currency': 'USD'})
elif condition_b:
    kwargs.update({'type': 'percentage'})

kwargs.update({'amount': x if condition_c else y})
coupon = Coupon.objects.create(**kwargs)


# Or with functools.partial()
FixedamountCoupon = functools.partial(Coupon.objects.create, type='fixedamount')
PercentageCoupon = functools.partial(Coupon.objects.create, type='percentage')

if condition_a:
    coupon = functools.partial(FixedamountCoupon, code=code, currency='USD')
elif condition_b:
    coupon = functools.partial(PercentageCoupon, code=code)

coupon = functools.partial(coupon, amount=x if condition_c else y)
coupon = coupon()

Yes, we just shortcuted two types of Coupon using functools.partial(), created "sub-class" of Coupon. Furthermore, if the underlying function accepts positional arguments, we can also shortcut those arguments.

Clean code FTW.

Friday, October 11, 2013

Scala Traits in Python?

Sometimes, I would question myself, am I qualify as a seasoned Python engineer? The answer is I'm still a junior. The next question is, how to qualify as a seasoned one?

I have two things in mind that may be part of the answer to the second question:

1. Know when to use certain Python features.
2. Know what kind of library or framework is suitable for particular task.

In this pyfun series, I will try to *log* some of the features that I think they make Python funny :)

Let's get back to the primary subject of this post. Scala, which compiles to JAVA bytecode and runs on JVM, is one of the latest big hit. So, I'm going through some tutorials of it to check out her magics. One of the topic is Traits.

Traits, is similar to Java interface. When I read some samples about it, I wonder how can it be done in Python. From stackoverflow, http://stackoverflow.com/q/6240118, there is a suggestion that to use Python class to simulate the thing. And, starting from that idea, I wonder can we do that in runtime instead of just static definition. Here, we come to Python type().

Most of the time, type() can be used as Enum in C (see http://stackoverflow.com/a/1695250), or dynamic objects like those in Javascript (https://gist.github.com/mrkschan/6936112). It is because type() is essentially a dynamic form of the class statement (http://docs.python.org/2/library/functions.html#type). In other words, we can use type() to create Python class that simulates Traits (JAVA interface) at runtime.

Here is an example.

# See original Scala version at http://twitter.github.io/scala_school/basics.html#trait
Car = type('Car', (object,), {'brand': ''})
Shiny = type('Shiny', (object,), {'refraction': 0})

BMW = type('BMW', (Car, Shiny,), {'brand': 'BMW', 'refraction': 100})
my_bmw = BMW()

print my_bmw.brand, my_bmw.refraction

# We can have constructor as well
def bmw_init(self, refraction):
    self.refraction = refraction

BMW = type('BMW', (Car, Shiny,), {'brand': 'BMW', '__init__': bmw_init})
c1, c2 = BMW(10), BMW(100)
print c1.refraction, c2.refraction

As we can see, we can use type() to create a set of "interfaces". And, use type() to create class that implement the "interface". These "interfaces" can have its name changed according to runtime conditions. type() is Python magic and it's fun :)

However, I did not come up with a use case for runtime defined Traits yet :P

Saturday, September 28, 2013

Bypassing (Great) firewall to access GitHub / BitBucket via SSH Tunnel

Sometimes, you may be blocked by a firewall and cannot access GitHub / BitBucket. In this post, the steps to bypass the firewall using SSH tunnel is documented.


Step 1 - Setup the tunnel
----------------------------------------

Assuming you use SSH to perform git operations (git clone, fetch, pull, merge, etc.), you should find a SSH URL like: git@github.com:example/example.git or git@bitbucket.org:example/example.git. In order to access the blocked SSH hosts, we have to SSH tunnel to forward the requests. To do so, use the following commands to create a tunnel (assume you have a SSH host that can be accessed).

ssh -C -L 8022:github.com:22 example@example.com  # Establish a tunnel to github.com, SSH requests to local port 8022 are forwarded to github.com:22.

ssh -C -L 8122:bitbucket.org:22 example@example.com  # Establish a tunnel to bitbucket.org, SSH requests to local port 8122 are forwarded to bitbucket.org:22.

Of course, you can combine the two to have one SSH session only.

ssh -C -L 8022:github.com:22 -L 8122:bitbucket.org:22 example@example.com


Step 2 - Config SSH client
------------------------------------------

After you have your tunnels, you can then configure your SSH client to redirect SSH requests to your tunnels. Put the following lines in your ~/.ssh/config file.

Host github.com
HostName 127.0.0.1
Port 8022

Host bitbucket.org
HostName 127.0.0.1
Port 8122


Afterwards, feel free to use git clone git@github.com:example/example.git or git clone git@bitbucket.org:example/example.git (you can also use git fetch, pull, merge, etc.). All requests will be passing through your SSH tunnel.

Friday, March 08, 2013

SEO Tips: Abuse Github

NOTE: I'm not a SEO guy. If this post used wrong wordings, sorry for that.  And, I'm not a native English speaker, don't blame my English writing :P And, I don't know whether someone has shared something similar :)

I have several pet projects hosted on github. And, I observed that Google give pretty high ranking to github repository. If a github repository has a homepage, that homepage will get benefits as well.

Thus, I carried out an experiment at https://github.com/mrkschan/github-seo-effect. I used the search terms "Github SEO effect" as the repository name and set the homepage that links to my blog post at http://mrkschan.blogspot.hk/2013/03/github-seo-effect.html

The result is pretty amazing. Here is a Google search result before I carried out the experiment (I was using Chromium private browsing, with links set to use "gl=us").

My blog post gets nowhere on the search result.

After a few days that I set the homepage to the blog post, the result becomes the following screencap.
My repository goes to the top of the search result. And, the blog post is on the first page of the Google Search :)

BTW, shall we abuse Github for SEO purpose? Try your search here: http://www.google.com/search?gl=us&q=github+seo+effect

Friday, March 01, 2013

Github SEO effect

This is a blog post to experiment the hypothesis:

Google would give github repo pretty high ranking.
If a repo's README has a link to a page outside github, that page gets SEO bonus.edit: 20130308 If a repo's homepage has set to a web page, that page would get SEO bonus from Google (I didn't carry out experiment on the effect of the README yet). And, if the page links back to the github repo, that's a plus.

Search google with the query "Github SEO effect" :)

Link: https://github.com/mrkschan/github-seo-effect

Result: http://www.google.com/search?gl=us&q=github+seo+effect

Thursday, December 20, 2012

How to use Shovel with Django

Here is my attempt to use Shovel (Rake, for Python) in Django.

Shovel can be used as an alternative to Django built-in Command. The reasons to use Shovel instead of the Command are:

1. "Rake, for Python" sounds cool.
2. Shovel is light-weight.
3. I can find all tasks in one place (the shovel/ directory).
4. I hate writing a list of make_option.
5. I hate inheriting LabelCommand, BaseCommand, NoArgsCommand, etc.

Okay, you get it... The reasons to use Shovel are actually: (i) "Rake, for Python" sounds cool, and (ii) I am lazy.

I didn't use the term "replacement for Django Command" because we cannot simply invoke Shovel task in the Django codebase using django.core.management.call_command(). (But we can have work-around, like making a Command to proxy the call)

Let's get back to my attempt to mix the two. I placed the shovel/ folder inside the Django project.

djangoproject/
  - manage.py
  - settings.py
  - urls.py
  - shovel/ 

And I setup the Django environment at the top of the Shovel task file.
try: # Load the django environment
    import imp
    import os
    import sys

    me = os.path.abspath(os.path.dirname(__file__))
    module_info = imp.find_module('context', [me])
    imp.load_module('context', *module_info)
except:
    print >> sys.stderr, 'Cannot setup Python environment from context.py'
At last, the setup injects a directory to Python sys.path and use Django function to load the settings.py.
def setup_django_env(path):
    from django.core.management import setup_environ
    try:
        module_info = imp.find_module('settings', [path])
        settings = imp.load_module('settings', *module_info)

        setup_environ(settings)
    except ImportError:
        msg = "Error: Can't find 'settings.py' in configured PYTHON_PATH", path
        print >> sys.stderr, msg
        sys.exit(1)

# assume shovel/ directory is placed at the same level of settings.py
setup_django_env(os.getcwd())
This is a common technique to integrate Django with other Python gears as well. By applying this technique, I can freely use any Django functions / models in Shovel.

NOTE 1: The name of Shovel task file cannot collide with any module/app name of the Django project.

NOTE 2: We can place the shovel/ folder outside the Django project but we have to use proper Python path and import statement (e.g. use `from themix.things.models import Thing` instead of `from things.models import Thing`).

My attempt can be found at - https://github.com/mrkschan/shovel-django-mix.

Friday, January 20, 2012

git-fix-whitespace series 1: Knowing about `git diff -p`

In the last post, the first requirement of the project (https://github.com/mrkschan/git-fix-whitespace) has been settled. The next requirement of this project is to read the git-diff patch in order to find any line changes that violate the whitespace rules specified in git config.

In a typical git-diff patch (see below), there are a few major parts.
  1. Line 1 provides metadata about the modified file. It gives the file path to the file, rooted at the git repository.
  2. Line 2 provides metadata about the git index and the file object discretionary access control list.
  3. Line 3 and 4 provides metadata about which file path is old and which is new.
  4. Line 5, 14, and 24 are metadata that tells which part of the file is modified. Let's take an example to explain this - "@@ -33,8 +33,7 @@ def sanitize_diff(git_diff):". "-33,8" tells that there is a diff hunk with 8 lines starts at line 33 of the old version of the file. "+33,7" tells that there is a diff hunk with 7 lines starts at line 33 of the new version of the file. As a result, the new version of the file gets one line fewer than the old version.
  5. The rest of the patch is the content in the modified file. Those lines are either prefixed by ' ', '-', or '+'. ' ' means no modification, '-' means removed line, and '+' means added line. Note, there is no line replacement since it is represented by '-' lines followed by '+' lines (see line 28-31).
After knowing the structure of a git-diff patch, the next step is to read and write the modified file.

Sunday, January 15, 2012

git-fix-whitespace series 0: GitPython vs libgit2

This is the first post of the git-fix-whitespace series. In this series, I will put some notes about working on the project - https://github.com/mrkschan/git-fix-whitespace. (NOTE: This series is a by-product of the git-fix-whitespace project, since my blog need some updates :P)

First of all, let me introduce the rationale of working on this git-fix-whitespace project. Most of the time, as a Python developer, I hate tab indentation and trailing whitespaces (read pep8). I know there are existing tools to "proof-read" a file using certain whitespacing rules. However, I insist to create my own tool to achieve the goal. Reason: I just wanna have a pet project that I LOVE to keep working on.

The very first requirement of this project is to support the configuration directives of git (see `man git-config` and look for `core.whitespace`). Hence, I need to find a tool that can read the git configuration files (both the user level git config file ~/.gitconfig and repository level git config file /.git/config). By using Google, I got GitPython and libgit2/pygit2. At first, I try to read the libgit2 python binding to see if I can read whitespace configuration by simple api calls. But it seems that it did not support that yet (as of 2012-Jan-15). Then I move on to GitPython. Gotcha! There's simple api call to read the core.whitespace configurations :) As a result, git-fix-whitespace got a dependency on GitPython at the moment.

Thursday, May 12, 2011

Stats for Firefox 4 Release Party on May 14

As you may know, we're going to have a Firefox 4 Release Party this Saturday in Hong Kong!! (see http://opensource.hk/node/666 :)

I would like to share with you some interesting stats we collected from the registration :)

At first, let's see who's coming :)


Most of us are user of Firefox :) You can find contributor as well :)

Then, which OS we use most???


Feeling sorry to "vista" ... what is it -.-? Anyway, what are we going to do this Saturday ?? hehe... see below :)

Saturday, November 20, 2010

Getting back XO-ing

Just finished a contest for the secondary school students ... now, i'm available for the XO :)

I met XO 2-3 years ago and I was involved in a project for XO. It's for the kids to practice oral English.

Given several vocabularies to the kids, ask them to pronounce it and we grade it :) The project involved porting an aged library from Windows to Linux and making a GUI for kids. No matter how well the grading is ... here is the current interface :)


So, kids can type in the vocabulary and speak to the XO... and XO tell them ... how well they are.

Here's a lovely video telling how they use it :)


OK. Kids are interested... So Why not making them more interested ^^? Stuffs come to my mind ... can we have a pretty face to them for the feedback about the grade? can we speak to them about the feedback? Those make me get excited with the Speak activity. And ... i just wanna integrate the whole thing with Speak...

Here's a prototype interface for it :)


Anyway, why do i do XO? several things come to my mind.
- it's less than USD$200
- its battery long-lasting
- it can be used under sunshine/sun-light
- it can connect to a Wifi access point 1KM away
- it can run Flash
- it gives kids High DPI screen (their eyes will be fine in using it)
- it gives kids Email
- it gives kids Game (not yet an AngryBird out there)
- it gives kids Wiki
- it gives kids Internet
- it gives kids Calculator
- it gives kids IM, WebCam, VOIP
- it gives kids Music, jamming
- it gives kids E-book
- it gives kids Scratch for learning programming (or just story-boarding)
- it gives kids Painting, Drawing
- it gives kids a Maze ... (many kids love playing it ... both boys and girls :)
- it gives kids ...
:
:
:
- it runs F/OSS
- And, it's less than USD$200

Thursday, August 26, 2010

GoF State Pattern implemented in Javascript UI component

In these recent weeks, i'm writing a javascript UI component that can shrink/expand and hide/show. I call it "browser" in later paragraphs.

It's a pretty easy-to-write component where it only has 3 different states as shown below.

The first state is a hidden state which the "browser" hides itself somewhere in the page.


When clicking on those boxes shown, the "browser" shows itself and presents an abstract view of data.


When selecting a little box of the list on the right, the "browser" enters a state that displays detail view of data.


Whenever in either the abstract or detail state, once the grey-out area or the little close button [x] got a click on it, the browser goes back to hidden state. And, the browser can switch between the abstract state and the detail state by clicking on some buttons.

So, it sounds strict forward and thus my very first naive attempt was to implement it by just using the event-driven approach which i explicitly controlled the hide/show and shrink/expand line-by-line with the help of some if-else statements.

But after doing that for 2-3 days... the mess becomes not-that-easy to manage and little UI bugs come out from those event handler blocks. I had to trace those handler blocks and to find out where the UI effect went wrong. So, i decided to rewrite the entire mess with the GoF State Pattern (spending half an hour or so in implementing that) and post it here :P

As i wrote, the "browser" has some states {hidden, abstract, detail} and each state will transit to each another triggered by some events. It is pretty nice that the situation aligns to the state pattern perfectly. So, what i need to do with javascript is to implement a browser object that holds a state object where the state object references to either a hidden or abstract or detail state object.


The above class diagram shows some of the details of my implementation. The enter() function of HiddenState is to hide the browser while the paint() function of it is to show the browser and transits the browser state from hidden to abstract. When AbstractState is set, it's enter() function displays the abstract content. Upon some events like button click, browser's roll() function is called and delegated to AbstractState roll() function where DetailState is going to be entered.

The full implementation of this "browser" is available at github (line 323-559). Although it's pretty long (i already skipped implementing the inheritance :P), the "browser" now is simply mixing the State pattern and UI event handlers for ui transition, effects, and content displaying. If you trace further down the source, you will find my naive strict forward implementation of the "browser" where i believe it's pretty a mess to manage :P

Tuesday, August 24, 2010

hacker...

in these few days, i was packing my desktop in school as i'm leaving it very soon. From the desktop, i found something which is GREAT and got my focus.

flying back to 2009 autumn, there was a zeuux summit held in CityU. It was my pleasure to see Richard Stallman and Akira Urushibata there.

And, what i found in my desktop is Akira's excellent presentation "slide". Enjoy it :D


Tuesday, August 03, 2010

python decorator for input validation

I was reading how decorator in python can be used to state machine... And, wonder, can this also apply to input validation for web framework like web.py.

I tried the following:
def getInput():
    ''' simulate web.input() for web.py framework '''
    return {
        'x': 'banananaa',
        'y': None,
        'z': 'zz',
    }

def validate_required(rules):
    ''' validation decorator '''
    def wrapper(method):
        ''' wrapping the actual handler '''
        def validate(*args, **kwargs):
            ''' validation take places according to rules '''
            inputs = getInput()
            for k in inputs.keys():
                if k in rules: f = rules[k]
                else: continue
                input = inputs[k]
                if not f(input):
                    out = 'Invalid input %s - %s' % (k, input)
                    print out # or raise Exception here to stop execution
            return method(*args, **kwargs)
        return validate
    return wrapper

class Handler:
    rules = {
        'x': lambda(x): len(x) > 0,
        'y': lambda(y): y is not None,
        'z': lambda(z): z is not None and len(z) > 3,
    }

    @validate_required(rules)
    def POST(self):
        print 'do something'

# simulate request handling
h = Handler()
h.POST()

Saturday, July 17, 2010

Ubuntu Enterprise Cloud: Experiencing the "Cloud" #2

Continue from last post, after solving the booting problem of vm instance (The cause of this problem is just my silly mistake which i ask vm to boot from a kernel image instead of vm image); several observations are obtained.


Observation-1
---
If you write to the root filesys of vm instance, the wrote data will not be saved to WSC when the instance is terminated. But, euca2ools provides "euca-bundle-vol" utility to "upload" a local filesys of an instance to WSC. That's to say ... u have to create another root filesys copy on WSC to save your write.


Observation-2
---
If a volume attached to 1 vm instance, it cannot be attached to other at the same moment unless it is detached. So, if you wanna host a shared data pool on eucalyptus, you have to use several vm instances to host nosqldb like mongodb or cassandra. And each of these instances has dedicated volume attached. Save your data via NoSQL :)


Observation-3
---
With eucalyptus managed network setting, network access to vm instances is controlled by security group. A security group will maintain a set of in-bound rules likes below:


PERMISSION admin default ALLOWS tcp 22 22 FROM CIDR 144.214.0.0/16
PERMISSION admin default ALLOWS tcp 22 22 FROM CIDR 10.2.0.0/16
PERMISSION admin default ALLOWS icmp 0 0 FROM CIDR 10.2.0.0/16
PERMISSION admin default ALLOWS icmp 0 0 FROM CIDR 144.214.0.0/16


For out-bound rules, setup firewall within the vm instances. Eucalyptus does not manage that.


Observation-4
---
As with eucalyptus managed private network, vm instances may use private IP address. To access them, you have to be connected to an instance at first and use the private IP address as locator. That's to say, you need to have at least 1 public IP address that the outside world can connect to an instance.

If you configured to use vlan enabled managed network, vm instances of different security group will have different subnet assigned. The virtual network isolation is done by this feature. To allow two subnet to communicate, add in-bound rules to the security group.

(But i'm still trying the network config, may have update on this later)


Personal opinion in managing the cloud with client tool
---
Hybridfox is great! But euca2ools with just cli is simple and even more great. I personally prefer euca2ools.


What's next??
---
Go ahead to host private AppEngine - appsacle. But, don't know whether i can get it managed with such a limited "availability" zone

Friday, July 16, 2010

Ubuntu Enterprise Cloud: Experiencing the "Cloud" #1

Continue from last post, this post documents my experience in setting up the ubuntu cloud.

Here is the resources i used to conduct the experiment:

* machine1 [Physical] - PentiumD 3GHz (core x2, VT-enabled), 2Gb RAM (512Mb x4), 200Gb HDD, NIC x1
* machine2 [vSphere VM] - Xeon X5560 2.8GHz (core x4), 2GB RAM, 100Gb HDD, NIC x2
* machine3 [vSphere VM] - Xeon X5560 2.8GHz (core x4), 2GB RAM, 200Gb HDD, NIC x1
* USB Thumb 1Gb x1
* CR-RW x2

To mostly align the architecture, the role of machines follow.
* machine1 - NC
* machine2 - CLC, WSC
* machine3 - CC, SC

And, these machines are connected by a single subnet (private network) 10.1.0.x while machine2 with another NIC connected to a "public" network.

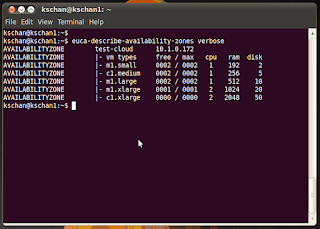
Setup of the machines "strictly" follows the user guide except the setup of NTP server. A public IP address is provided to CC as the "elastic" address of VM instances. The availability zone is resulted as follow.


Each row of the table describes a particular type of VM that can be created. The availability of particular type can be found in the "free/max" column. The "max" is computed according to the number of CPU in NC machines by default (in this case, exactly 2). The number of CPU in NC can be shrank or grew according to config (see edit 2010-07-19). The cpu, ram, disk of particular type can be configured via the web interface of CLC.

After the installation of controllers, it's time to prepare the VM image. VM image has to be prepared by user and uploaded to WSC. The preparation requires KVM in UEC. If you don't wanna prepare your own image, just download it from ubuntu as shown.


After uploading the kernel, initrd ramdisk, and root file system (the vm image) to WSC, that's the time to use Hybridfox to start VM instances. Selects the uploaded image and launches VM instances according to that image.


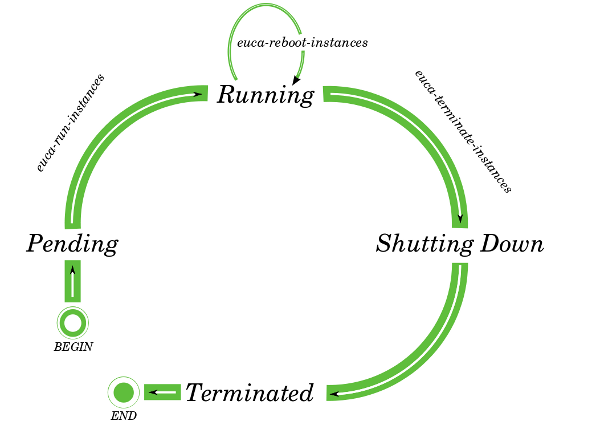
When NC receives the request to launch VM instances, it retrieves the VM image from WSC. This is the "pending" phase of VM instance. Once image is loaded, VM instance gets booted and entering "running" phase. When VM instance receives shutdown request, it enters "shutting down" phase and finally goes to "terminated" phase. Phase change follows.


In this experiment, i try to launch 2 instances so that there will not be enough "elastic" IP addresses for the instances. My observation is that when launching the first instance, it acquires the "elastic" IP address. When launching the second instance, a complain is shown and asking to launch the instance with "private" address. Indeed, Eucalyptus CC contains a DHCP server and manages VLAN for "private" address. The "elastic" IP address can be detached from and attached to any instances at any time frame.

Let's get back to the last figure showing Hybridfox.


As you may noticed, the console output of the VM instance in the figure shows error message during the boot time. That's my next problem need to be solved.

***EDIT 2010-07-17*** The boot problem is solved... the cause is that i made a mistake to ask a VM to boot from a kernel image, instead of a vm image :P Now, i can ssh to the vm instance ^^"

***EDIT 2010-07-19*** The max of "Free/Max" of a node can be configured by NC's config MAX_CORES, MAX_MEM, and SWAP_SIZE, according to this post.

***EDIT 2010-07-20*** For MAX_MEM configured more than actual physical memory, sorry. See this post.

---

Something happened during the setup...

I was trying to burn ubuntu-1004-amd64 to one of the CD-RW. When using the CD-RW to install ubuntu onto the physical machine, it blamed that the disc was corrupted. Then, i tried burning another CD-RW... same corruption happened. Lastly, i used USB thumb as live-usb and got no file corruption.... As a result, i spent about 2 hours in doing this.

This is the first time i managed a machine with 2 legs (NIC x2) ... Some mis-configurations existed and thus slowing down the entire experiment.

Wednesday, July 14, 2010

Ubuntu Enterprise Cloud: Explaining the "Cloud"

Ubuntu Enterprise Cloud (UEC) depends heavily on KVM as the hypervisor and Eucalyptus as the elastic cloud solution.

In this post, a brief explanation of the Eucalyptus solution will be given.
[Disclosure: I just read a conference paper from Eucalyptus and a user guide to write this post... Some info. may not be detailed or having mistake. If there's any mistake, please point it out directly. I will later setup a private cloud for testing soon.]

Here is the architecture of Eucalyptus (direct linking from user guide).


There are few components in the architecture:
  1. Cloud Controller, CLC (Interface with user)
  2. Cluster Controller, CC (Sits in between CLC and NC, governing a cluster of node)
  3. Node Controller, NC (Live in a node)
  4. Walrus Storage Controller, WS3 (Keeping VM's kernel, root filesystem, and ramdisk)
  5. Storage Controller, SC (The datastore)
Indeed, the very basic setup of UEC requires two machine. One of them MUST have Intel-VT / AMD-V enabled CPU for hardware virtualization acceleration (requirement of KVM indeed). So, let's say the first machine without Intel-VT / AMD-V CPU is named "uec-master" while another machine with the CPU is named "uec-node".

The Node Controller is going to be installed in the machine uec-node. NC is a software package that communicates with the KVM installed in uec-node. The communication is carried via libvirt. The "elastic" VM instances are going to be deployed onto uec-node running on top of KVM.

Other four controller: CLC, CC, WSC, SC can be installed on another machine uec-master. CLC is the software package that interfaces with user. CC is the package that masters a set of nodes (talking to NC directly for operations). WSC is the package to simluate Amazon S3 and maintaining the VM instance kernel, root filesys, and ramdisk. SC is the package to manage the actual datastore (volume or file space to be mounted) used by VM instances.

To setup VM instances, user have to first prepare the VM kernel and root filesystem (there're tools existed to aid you). This preparation is done via KVM. That's to say client machine used to prepare VM image would probably have Intel-VT/AMD-V CPU. After packaging the kernel and root fs, user can "upload" the package via CLC to WSC.

When user want to allocate resource for the VM instances, user have to assign a datastore for the instances. The datastore will be kept in SC. Once prepared, user issues instance-start to CLC and the CLC will forward the request to CC. CC will pick NC to serve the request; NC will finally load the the VM image from WSC and mount the volume from SC.

Thus, there will be 1 or more instances sharing the same volume from SC. The data persistence uses AoE or iSCSI protocol (which i have no idea at all yet :P).

So where does "elastic" come from? VM instances (CPU and memory resource) can be added to/removed from the cloud dynamically. SO elastic, man~ Apps running on VM instances have no idea of the CPU, memory, and the actual datastore. SO virtual, man~

Note that ... "any" Amazon S3 and EC2 client application would work with Eucalyptus as they share the same SOAP interface (REST interface for datastore).

Questions?

*** EDIT 2010-07-17 *** When a volume is attached to 1 vm instance, it cannot be attached to other vm instances at the same moment.

Tuesday, June 08, 2010

Quicksilver String Ranking Java Port

I search the phrase "Quicksilver String Ranking Java Port" in google... cannot find some interesting result...

so i just wrote one - http://github.com/mrkschan/qs-score-java/blob/master/QSString.java

One point to note is that ... In Java (v6)... String is a final class that cannot be extended... so i have to wrap a string and make this class less convenient.

Rationale for this: i'm writing a string filter for a eclipse plug-in which i wanna use a fast and excellent string ranking algorithm. Quicksilver is the way to go :)
 
© 2009 Emptiness Blogging. All Rights Reserved | Powered by Blogger
Design by psdvibe | Bloggerized By LawnyDesignz